I believe you must have seen those bubble-making machines in your aquarium. Those are air pumps and are mainly used to filter the aquarium water.
Moreover, these fish tank air pumps also make your aquarium look aesthetic. But how do you use or install them?
That’s why this article is here to provide you will all the necessary guidelines. So, keep reading till the end to know it all.
What’s an Aquarium Air Pump?
Before we get on with the installation process, we first need to know what’s an aquarium, or fish tank air pump is.
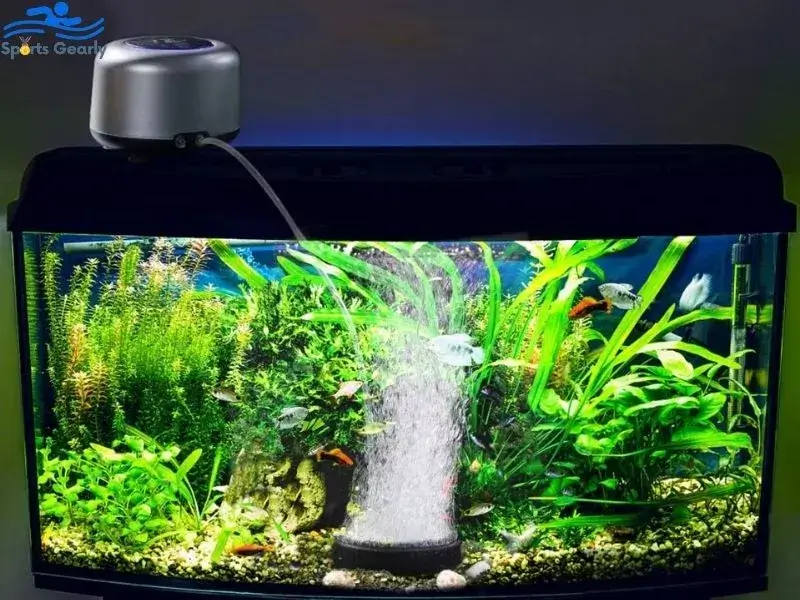
A fish tank air pump is a device that’s settled outside of your fish tank. The air pump either uses electricity or a battery power source to get operated.
The air moves from this air pump into the aquarium water. After that, it creates bubbles that eventually float onto the surface of the water.
The importance of these bubbles is to create movement and proper surface agitation in the water. A good surface agitation will always make sure that effective gas exchange is taking place in your aquarium.
This will help remove the excess carbon dioxide in the air, and the new and fresh oxygen gets properly dissolved in your fish tank water to help your adorable fish breathe.
Why Are Air Pumps Used?
There are many reasons you can use an air pump for your fish tanks. You can also connect your fish tank with various other devices in the aquarium to give it a whole new look.
In this section, I’ll tell you all the reasons why you would need air pumps for your lovely-looking aquariums.
- Air stone: These air pumps create fine and tiny bubbles from your air pump. This not only contributes to improving the filtration but also helps to reduce the pump noise or even gives your aquarium a decorative look.
- Corner box filter, sponge filter, or under gravel filter: This actually helps to use rising bubbles to draw in through the fish tank filter easily and then strain out those floating particle
- Bed filter movement: This actually uses the air to churn up the biological filter media and then contribute to growing the beneficial bacteria.
- Aquarium decoration: The use of the bubbles and make your fish tank look very aesthetic and decorative.
- Breeder Box: This helps to increase that flow in the box to prevent any type of stagnant water and even improve oxygenation.
Aquarium Air Pump and Its Installation Process
A fish tank air pump can easily suck the air out from the fish tank and then pump it back to the submerged fish tank apparatus.
For this reason, you’ll be needing some air pump accessories to easily guide the flow of air in the correct direction and that too with the proper pressure.
If you are a beginner, then I’ll suggest you get an airline tubing and then check the valve to start the procedure.
Although there are a few other optional items, depending on the type of air pump application you are choosing.
These are things that you’ll be needing for the installation process:
- Check valve: This prevents the water from spilling out of the aquarium tank if the fish tank air pump loses power or gets turned off.
- Airline tubing: It directs the flow of the air from the air pump into the fish tank or aquarium ornament.
- Air valve: This controls the amount of air flowing from the fish tank air pump into the fish tank.
- T splitter: This helps to split an airline into two different channels. It permits an individual air pump to operate on two other devices.
- Airline holder: It uses some sort of suction cup to hold the airline tubing in its correct place. It can be either outside or inside the aquarium.
- Gang valve: It controls and splits the flow of the air pump to four individual fish tank devices.
- Airline connector: This helps to connect two different pieces of airline tubing to reach longer distances.
Once you have got all of these, now you can start off with the installation.
Step-1: At first, place your air pump outside of your aquarium. After that, cut down the airline tubing in its appropriate length so that the tubing has the perfect size to be connected with the air pump and also the fish tank device.
Step-2: Take one end of the airline tubing and connect it with the aquarium device. After that, place the aquarium device inside the fish tank. Then take the end of the tubing and combine it with the air pump.
Step-3: If your air pump is at such a position that it’s higher than the peak of your fish tank, then you don’t need to follow this step. But if your fish tank pump is settled lower than the peak of the fish tank, then you need to get a check valve to stop any sort of water leakage through your airline tubing.
After you are done with all of these, you will now cut down the tubing somewhere in the middle of the aquarium device and sponge filter. And then, attach your check valve in the middle in such a way that the flapper is facing your air pump.
Note: If you attach the check valve in the backward direction, no air will flow when you switch on your air pump. So, make sure to check the valve around.
Step-4: In this final step, make a drip loop with the fish tank’s power cable and then plug the air pump. Within just a few seconds, you’ll be able to see bubbles coming out of the fish tank’s device.
Bottom Line
Fish keepers are so fond of these air pumps because this particular technology has been proven to be dependable for those tiny creatures.
The flow is highly soothing, and it’s also very cost-efficient. Especially when you are running many fish tanks together. Yes, although these pumps’ sound can be annoying, there are even ways you can follow to minimize them.
Overall, aquarium air pumps are essential for your fish to survive, and you do need to know how to use and install them.
But now I believe with the help of this article; you’ll be able to know all the ins and outs of it!